


How to run Pandas in AWS Batch
Move your pandas scripts into the cloud and expand your capabilities


If you have come to this article, you properly already have a reason to run Pandas code in the cloud. But if you are just reading a long out of curiosity then let me briefly explain what Pandas is and why running it on AWS (Amazon Web Services) Batch is clever.
Why is everyone talking about Pandas?
Pandas is the most widely used python package for data science and data engineering. It is built on top of another popular package called NumPy in the same way as many other packages depend on Pandas. The DataFrame object within Pandas can be used to do things like data extraction (ETL), data cleaning, data normalization and other computations needed when analyzing data. Think of the DataFrame object as a big spreadsheet. You can have many sheets and you can do a lot of different operations on the data in the sheets.
Working with BigData in Pandas
By default, Pandas works with all the data in-memory meaning that the full data frame will be loaded into the RAM of your computer. Because of that there is a natural limit to how much data you can work with using Pandas. Other packages such as Modin, Polars and Dask accommodate this by splitting up the dataset to only have parts of it in memory at the same time while saving the rest on disk. This is smart for data that can be computed in chunks but also complicates a lot of things. This requires the data scientist to focus more on programming and less on analyzing and extracting knowledge from data.
Utilize the power of the AWS Cloud
One way to avoid using out-of-memory libraries such as Python Dask is to utilize the compute power of the cloud. Cloud computers are more available than ever, and the prices has never been better.
At the time of this writing there are 516 different computer configurations available in the AWS Ireland region. Ranging from 512 MB in memory up to 12.288 MB (12 TB). Prices go as low as 0.0046 USD per hour and up to almost 122 dollars (90K per month) so be careful what instances you spawn up in the cloud. It can cost you.
Besides giving access to almost endless memory, CPU and GPU power the cloud also brings other benefits to the table.
Run code any time of the day without turning on your computer. This is perfect for ETL jobs that needs to run on a regular basis e.g. every hour or once per day. Use AWS Eventbridge to schedule your scripts to run on a regular basis.
Do not worry about the computation time. If you have very long running scripts e.g. very heavy computations such as training a neural network you can start the training in the cloud shutdown your computer and check-back when it is done. No need to have your laptop running with 100% CPU usage for hours. Be careful though, you pay for the time you occupy the computer in the cloud.
Collaborate easier with your colleagues The cloud is empowering you to collaborate and reach better results together with your colleagues. Use a version control system such as Git to work on the same code and deploy to the cloud when you are satisfied.
Now that you are convinced of the benefits of running your Pandas scripts in the cloud it is time to get concrete. Let’s be honest there are millions of ways to run Python scripts in the cloud. Most Linux distributions come with Python preinstalled so you can essentially just spawn up an EC2 and run your script. But we are a bit more ambitious and want to use AWS Batch.
What is AWS Batch?
Essentially Batch from AWS lets you run a program from a Docker image on either the EC2 or Fargate platform. It will take care of provisioning the resources needed for your job. Nothing more than that. It is intended for code that runs in a certain amount of time and then shuts down. So this is not something you can use to run a deamon or server.
Put it simple Batch is just a layer on top of the cloud that simplifies the deployment of your code.
How is the lifecycle of a Batch job?
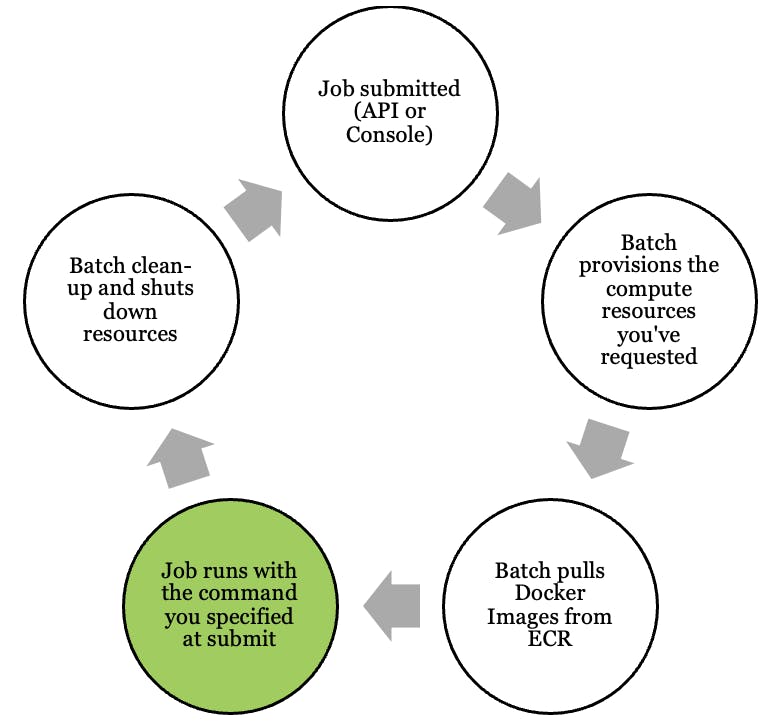
You submit a job to AWS Batch and instructing the cloud to find the resources needed to run your code. You define what resources is needed in the Job blueprint. Amazon calls this the Job Definition. There are many ways to start the jobs (submitting a job). You can do it through the management console off course but also through the API. The most common way is to configure a schedules job through AWS Eventbridge. If you need sophisticated logic to run before/after/simultaneously while the job is running you can use AWS Step functions to orchestrate that.
Batch is booting up the EC2 or Fargate instances you have specified in the job definition.
Batch pulls in the Docker image from the Elastic Container Registry (ECR). This is just the database where you store Docker images. I recommended that you use AWS Codebuild to automatically rebuild the Docker images when you push to your Git repository. This allows for continuous deployment.
The cloud will run the Docker container along with the command you specified in either the Job definition or the actual job.
When the job has finished or reached the timeout AWS Batch will shut down the resources, so you are not paying for them anymore.
The process will start all over again every time you submit a new job to Batch.
Example
Let us build a simple and completely meaningless Pandas script that generates a data frame with random numbers, takes the square root of the first column and writes it to S3 as a CSV file. Everything is pure NumPy and Pandas so all data lives in memory and no exotic libraries are needed. That is how we like it.
We will use AWS Data Wrangler to write the data to S3.
Here is how the script/job looks. If you want to code along with me please save the file in an empty folder and call it main.py
import awswrangler as wr
import pandas as pd
import numpy as np

# Initialize the Pandas Dataframe
df = pd.DataFrame()

# Generate two random columns
n = 1000000
df['rand_one'] = np.random.sample(n) * 1000000
df['rand_two'] = np.random.sample(n)

# Manipulate df.rand_one by taking the square root
df['rand_one'] = np.sqrt(df['rand_one'])

# Use AWS Data Wrangler to write CSV file to S3
# Remember to set-up the correct Permission on the
# execution role of the AWS Batch Job Definition
wr.s3.to_csv(
    df=df,
    path="", # Write path to your S3 Bucket here
    sep=";"
)
Build Docker Image and push to ECR
In the same directory create a file called “Dockerfile”. In here we will put our Docker commands and instructions in how to start the script. It looks something like this.
FROM python:3.7.13-buster

WORKDIR /srv/app

# Copy everything from into root
COPY . ./

# Install requirements
RUN pip3 install -r requirements.txt

# Run the main file if nothing else is defined in "docker run"
ENTRYPOINT ["python", "./main.py"]
I assume you have Docker installed on your computer and working on Mac. If not the case go find a guide on how to build a Docker image from a Dockerfile on the internet. There is plenty of content on the topic out there.
Here are the commands I am running to push image to ECR.
# Navigate to the folder where the main.py file and Dockerfile lives
cd [PATH HERE]

# Build the Docker image on Mac M1 silicon chip
docker buildx build -t my-little-batch-job --platform linux/amd64 .

# Tag the image
docker tag my-little-batch-job:latest [URI FROM AWS ECR Repository]

# Push the image
docker push [URI FROM AWS ECR Repository]
If everything went successfully you should see the image in the AWS Console when you navigate to ECR.
I suggest you investigate using Codebuild to build the image automatically on every push. It will save you time especially if you are changing your code often. Also you will not need to remember all the commands for building and pushing the image since you only need to set it up once.
Now we have everything we need in the cloud to run build a job definition. We just need to head to the console to build a job definition. There are a lot of steps to setting up the job definition but be patient when you have finished you are almost ready to run your first job.
Follow the steps on this page and head back to this page afterwards. If you instead want to run on Fargate use this guide. If your code need more than 30 GB of memory you will not be able to run it on Fargate.
The job definitions are versioned meaning that if you want to do changes to the blueprint you need to create an updated version of the definition.
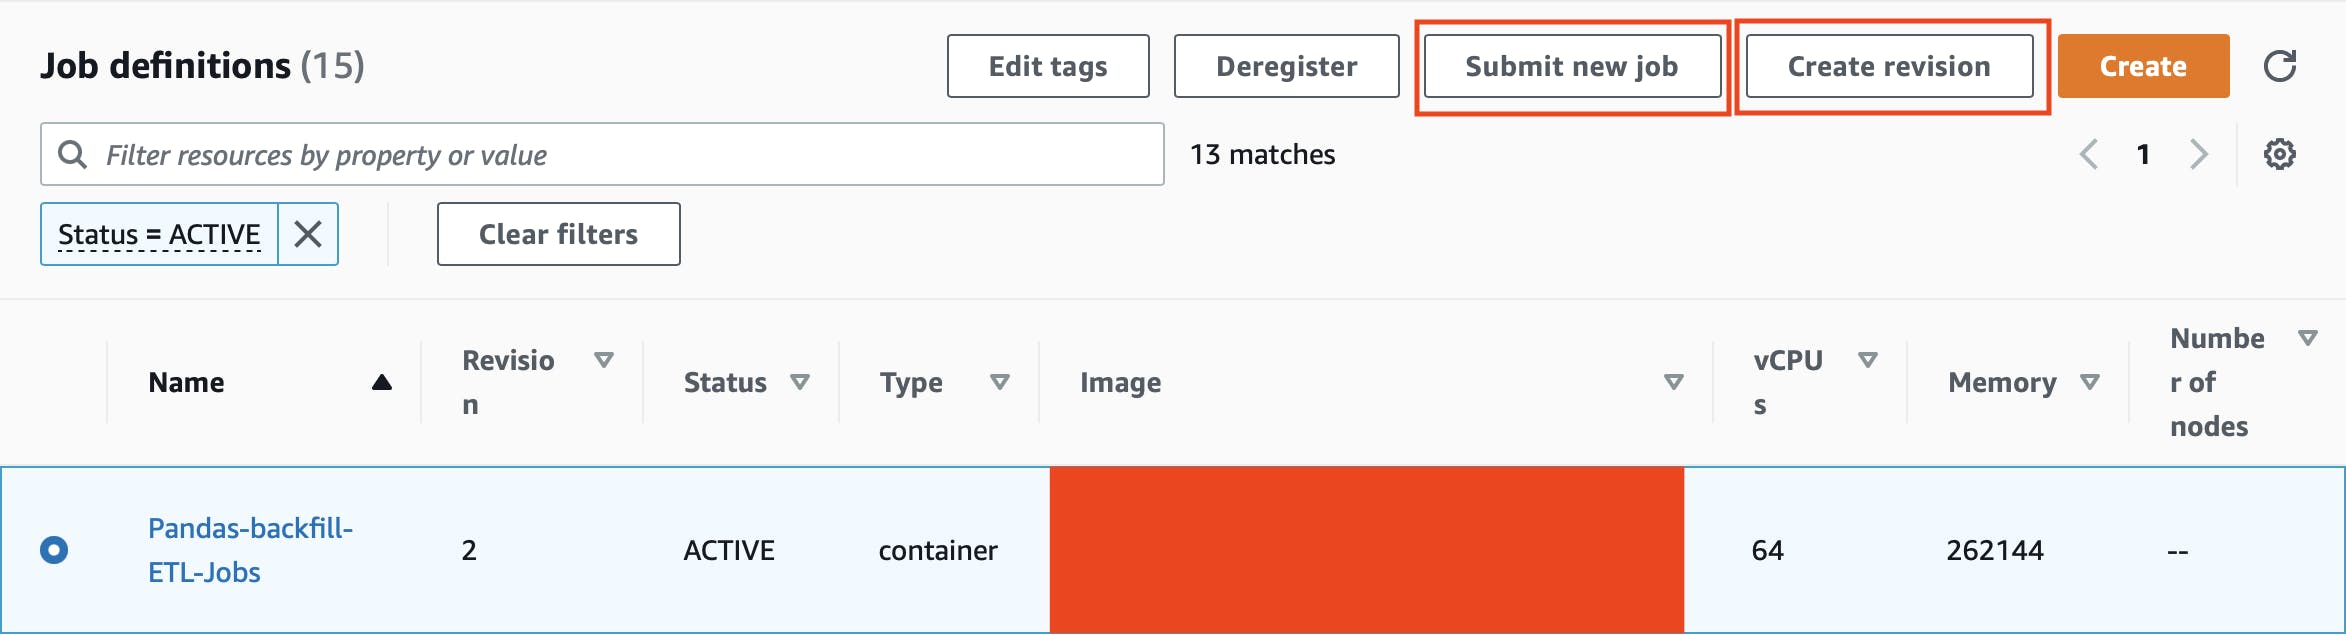
When submitting a job (instructing the cloud to run a batch job) you need to define what job definition to use along with the job queue. The job queue is approximately FIFO and will run jobs on the compute environment you define.
You now have everything you need to submit a job and start running your script. Select the job definition like on the picture above and select “Submit new Job”. Fill out the form requested and click “Submit” at the bottom of the page. You job will now be submitted to the job queue and go through several steps.
It can take some minutes for the job to go through the first four steps. It depends on what memory and cpu requirements you need and the availability in the region you are operating. Fargate jobs will most likely start quicker than EC2 jobs.
When the job has finished the console will display either “Succeeded” or “Failed”. Let’s assume you have been good and everything went according to plan. Then you can head over to your S3 bucket and you should see a CSV file.
I hope this small walkthrough helped you gain confidence to try to move your data science scripting from your laptop to the cloud. Especially now that you do not need to learn new Python packages but can stick with good old Pandas.
Using the cloud will without doubt open up a lot of new possibilities for you such as computing large data-sets even without chunking or parallelization.